
Everything from the first start to satellites. Bleeps works like WSJT-X where it can, so if you run FT8, most of this will feel familiar.
Open with File → Settings…
| Setting | What it does |
|---|---|
| Callsign | Goes out at the start of every message, so the others see who is talking. |
| Theme | System follows Windows, or always Light or Dark. Takes effect when Bleeps starts again. |
| Audio input | The sound card input that carries the radio's receive audio. |
| Audio output | The sound card output that goes to the radio's data or mic input. |
One radio, no profiles — what you set here is what Bleeps uses. Fields that do not apply to your choice turn grey.
| Setting | What it does |
|---|---|
| Rig | Your radio from Hamlib's list. None (no CAT): no radio control, PTT on VOX or an RTS/DTR line still works. Hamlib NET rigctl talks to a running rigctld, FLRig to FLRig. |
| Port | The COM port of the radio, or host:port for rigctld (127.0.0.1:4532), FLRig (127.0.0.1:12345) or a radio on the network. |
| Baud rate, bits, handshake | Must match the radio's CAT menu. Default is what Hamlib uses for that radio. |
| DTR / RTS | The control lines of the CAT port. Some interfaces need one high (power) or low (to avoid keying the radio). |
| CI-V address | For Icom, Xiegu and other CI-V radios. Filled in with the model's default from Hamlib; only change it if you changed it in the radio. |
| PTT | CAT keys through Hamlib (also via rigctld/FLRig). RTS/DTR uses a serial line, on the CAT port or a PTT port of its own. VOX lets the radio key on the audio. |
| Mode | What the radio is set to when you pick a band: Data (USB-D / DATA-U), USB, or None to leave it alone. |
| TX delay / PTT tail | Time between PTT and the audio, and how long PTT stays down after it. |
| Poll every | How often the frequency is read back from the radio. |
Sharing the radio. Start rigctld yourself (for example rigctld -m 3073 -r COM5 -s 19200 for an
IC-7300) and pick Hamlib NET rigctl with 127.0.0.1:4532 — handy when WSJT-X or a logger uses
the radio too. For FLRig pick FLRig and 127.0.0.1:12345.
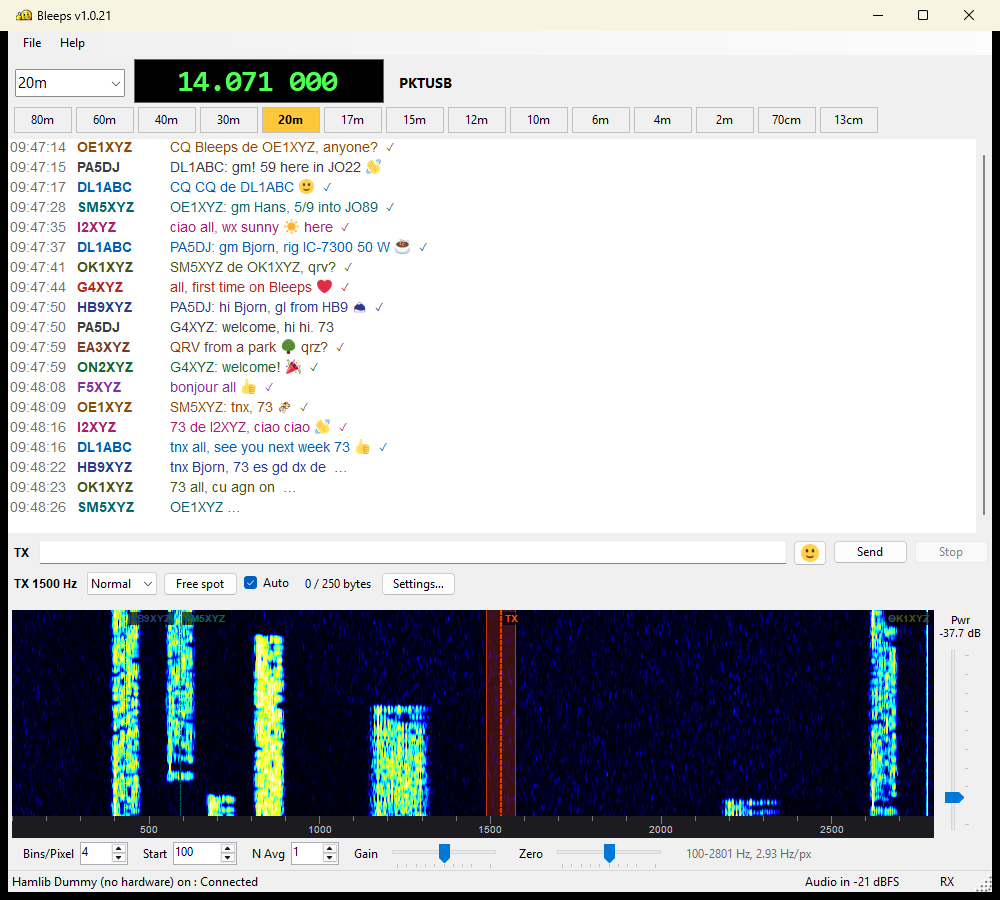
The bar at the top works like WSJT-X:
14.071) or a band (20m) and press Enter.The list itself is in Settings → Frequencies: a grid like WSJT-X's with band, frequency, IARU region and a description. Right-click the list for Insert, Delete and Reset to the defaults (the standard list, as on the home page).
The frequencies may still change. They are suggestions while Bleeps is new, and may move in a later version — above all when one turns out to disturb another mode: Bleeps does not want to get in the way of FT8, FT4, CW, RTTY, phone or anything else. Before you send, listen whether the frequency is free. After an update, right-click the list and choose Reset to the defaults to load the new standard list (your own additions are then gone, so note them first). The current list is always on the home page.
The waterfall shows the audio passband, built like WSJT-X's Wide Graph: fine resolution, averaged in power. A Bleeps signal is four thin lines next to each other; stations being decoded are marked with their call in their colour.
| Control | What it does |
|---|---|
| Bins/Pixel | Horizontal zoom: how many frequency bins one pixel holds. Clears the picture. |
| Start | The audio frequency (Hz) at the left edge. Clears the picture. |
| N Avg | How many spectra are averaged per line — the speed of the waterfall. 1 is the fastest; higher is slower and smoother. |
| Gain | Contrast: higher makes weak signals stand out more. |
| Zero | Moves the noise floor up or down (brightness). |
:) ;) :D
<3) or a code like :beer: — it turns into the emoji as you type.CALL: ; right-click a line to copy it,
send next to that station, or give the station its own colour.Every chat is saved per day in Documents\Bleeps\chat\YYYY-MM-DD.txt (File → Open the chat log folder).
The TX drive slider right of the waterfall attenuates the transmit audio in dB, like WSJT-X's Pwr. Set it so the radio's ALC stays (almost) still — a clean signal is decoded far better than a loud one. You can turn it while sending.
Like WSJT-X's --rig-name, you can run several Bleeps at the same time, each with its own radio:
"C:\Program Files\Bleeps\Bleeps.exe" --rig IC9700Each name gets its own settings (%APPDATA%\Bleeps - IC9700), its own logs and chat logs
(Documents\Bleeps - IC9700) and its name in the title bar. Make a shortcut with the flag after the target to
start it with one click. The same name cannot run twice.
Bleeps was designed for full duplex, as on QO-100: you send on the uplink and receive the downlink at the same time. Turn on Full duplex in the chat settings (Settings… next to the TX line) and the decoder and the waterfall keep running while you send. You keep reading the others while your own line goes out, and your own signal coming back from the satellite is marked ↩ ✓ on your own line.
It works just as well in simplex, with one radio that either sends or receives. Leave Full duplex off then: the radio's receiver is muted while you send, and Bleeps listens between your messages.
The 13cm entry is the QO-100 uplink (2400.060 MHz; the downlink is 10489.560). Feed the downlink receiver's audio to Bleeps' input and the uplink transmitter from Bleeps' output, and turn on Full duplex.
On HF or VHF you can get full duplex too, with an external SDR receiver next to your radio:
Your own transmitter is very close. Keep the SDR's antenna well away from the transmitting antenna, or use a receiver that can take a strong signal, so it is not overloaded or damaged.
IC-9700 and other satellite radios. Bleeps notices when the radio is in satellite mode and then shows TX = SUB (uplink) in the dial and RX = MAIN (downlink) next to it. Both are read automatically: the radio only reports the selected band, so Bleeps selects the other one for a moment every 2 seconds, reads it, and selects yours again — the way satellite programs do. Never while transmitting. Bleeps does not tune in satellite mode; that is up to you or your tracking program. This needs a direct connection to the radio (COM port or its network port), not rigctld or FLRig.
| What | Where |
|---|---|
| Settings | %APPDATA%\Bleeps\bleeps.ini |
| Frequency list | %APPDATA%\Bleeps\frequencies.json |
| Chat logs (per day) | Documents\Bleeps\chat\ |
| Debug log | Documents\Bleeps\debug\Bleeps.log (File → Open the log folder) |
With --rig NAME the folders are called Bleeps - NAME.
| Problem | Try this |
|---|---|
| Dial is red / “no CAT” | Wrong COM port or baud rate, or another program has the port open. Close it, or share the radio through rigctld or FLRig. |
| Radio does not key | Check PTT in Settings → Radio: the radio must accept CAT PTT; for RTS/DTR check the line and port; for VOX turn VOX on in the radio. |
| Nothing decodes | Check the audio input and level (the noise should be visible in the waterfall), and that the radio is in USB/DATA on the right frequency. |
| Others can't read you | Lower the TX drive until the ALC stays still. |
Satellite mode shows -- . --- --- | Bleeps reads MAIN and SUB itself within a few seconds — but not over rigctld/FLRig. Connect to the radio directly. |
| Something else | Look in the debug log (File → Open the log folder). |